Repair Paint on Wall: A Practical DIY Guide
Step-by-step instructions to repair wall paint, patch holes, match color and finish, with tools, tips, and safety considerations for a seamless, durable result.

With this guide you will learn how to repair paint on wall—from spotting damage to patching, sanding, priming, and blending colors. You'll choose the right patch material, prep the surface, apply patches flush, and finish with primer and matched paint for a seamless result. A practical, step-by-step approach makes DIY repairs durable and visually invisible.
Why repair paint on wall matters
According to PaintQuickGuide, maintaining your walls is more than just aesthetics; it protects the underlying surface from moisture, cracking, and further deterioration. A small patch, if done correctly, can prevent larger problems down the road and save you from a full repaint later. Properly repaired walls also keep rooms looking cohesive, which helps with resale value and daily enjoyment. This section explains the rationale behind fixing blemishes promptly, the subtle cues that repair is needed, and how a well-executed patch blends with the surrounding finish. You’ll notice that the more you invest in prep and color-matching, the less noticeable the repair will be. For reference, consult broadly accepted safety practices from reputable sources such as OSHA and EPA for handling paints, solvents, and lead-paint considerations as applicable to your project. PaintQuickGuide’s approach emphasizes low-dust methods, proper ventilation, and using painter’s tape to protect adjacent surfaces while you work.
Assessing damage and selecting the repair method
Not all wall blemishes require the same fix. Start by categorizing damage into minor surface imperfections, small holes or dents, and larger gouges or cracks. For tiny dings, pre-mixed spackling or lightweight joint compound is usually enough, while larger holes may need patching with mesh tape and a setting compound. Before you pick a method, inspect the wall for moisture intrusion, staining, or structural movement, which would demand a more comprehensive solution. If the damage is near corners or trim, mask the area with painter’s tape and protect floors with drop cloths. PaintQuickGuide recommends testing a small patch in an inconspicuous area to confirm color and sheen compatibility before committing to the whole wall. Finally, consider the sheen of your existing paint—eggshell, satin, or semi-gloss—so you can blend the repair without drawing attention. For safety and best practices, review reputable guidelines from government or educational sources when dealing with potential hazards like lead paint or hazardous solvents.
Preparing the surface for painting repair
Preparation is the secret to a durable repair. Start by cleaning the area with a mild detergent solution to remove dust, grease, and chalkiness that can prevent patch adhesion. If you see loose paint, gently scrape it away using a plastic putty knife; avoid metal tools that can gouge the wall. Dampen the surrounding area slightly to minimize dust, then wipe again and let it dry. Lay down drop cloths and seal off adjacent surfaces with painter’s tape. Lightly sand the damaged zone with 120–220 grit sandpaper to create a slightly rough surface for better patch adhesion. Remove any dust with a tack cloth before applying patching material. For moisture-prone areas like bathrooms, ensure ventilation and consider a moisture-resistant primer for long-term durability.
Patch types and application techniques
There are several patching options depending on the severity of the damage. For tiny holes, a thin layer of spackling compound applied with a putty knife works well. For larger holes, use a patch with self-adhesive mesh or paper tape under a joint compound layer. Apply patching material in thin, even coats, allowing each coat to dry before adding the next. Feather the edges past the damaged area to avoid noticeable ridges. If using setting-type joint compound, follow the manufacturer’s drying times and sand when firm. Always re-check the surface with a straight edge to ensure flushness. After the final coat, let the patch cure according to product guidelines, then lightly sand until the patch is smooth and seamless with the wall.
Sanding, priming, and color matching
Once the patch is dry, sand it flush with the surrounding wall starting with medium grit and finishing with fine grit for a smooth surface. Wipe away dust with a tack cloth and inspect the patch under your room’s typical lighting. Prime the repaired area with a stain-blocking or bonding primer to improve adhesion and prevent topcoat penetration. If you suspect color matching challenges, test a small amount of your final paint on a hidden spot and evaluate under several lighting conditions. When ready, apply the matched color in light, even coats, feathering beyond the repair to blend with the surrounding wall. If the sheen differs, adjust with a compatible topcoat and allow proper curing times between coats.
Finishing touches and curing time
After applying the final coat, allow the paint to cure in a well-ventilated space. Avoid heavy use of the area for at least the manufacturer-recommended period to prevent marring the finish. Check for touch-ups in different lighting to confirm consistency, especially at edges and corners where shadows can reveal repairs. If the finish looks blotchy, consider a light feathering pass with a barely loaded brush or roller to even out the sheen. Remember to clean brushes and tools promptly to preserve their life for future touch-ups. Throughout, follow safety guidelines for ventilation and avoid inhaling fumes when working with solvent-based products.
Troubleshooting common issues
Even well-executed repairs can show small flaws if the surface wasn’t prepared correctly or color matched poorly. Common issues include a visible patch seam, mismatched sheen, or slight color shift after drying. If you notice a seam, re-apply a very thin coat of joint compound, sand gently, and re-prime before repainting. For sheen mismatches, verify that you used the same sheen level and consider applying a glaze coat or a thin final coat to equalize the appearance. Light from different angles can make patches more visible, so check the repaired area under multiple lighting conditions. If paint keeps peeling or cracking around the patch, re-check moisture levels, wall substrate, and primer compatibility. For further guidance, consult reliable safety and technique resources from recognized organizations.
Tools & Materials
- Putty knife (0.5–1 inch)(For applying thin patches and smoothing edges)
- Plastic putty knife (2–4 inches)(For larger patches and smoothing)
- Spackling compound or lightweight joint compound(Choose pre-mixed for small holes; setting compound for larger patches)
- Mesh or paper patch tape(Use under joint compound for larger repairs)
- 120–220 grit sandpaper(Feather edges and smooth patch)
- Tack cloth(Remove dust before priming)
- Primer (bonding or stain-blocking)(Prevents bleed-through and improves adhesion)
- Interior latex or acrylic wall paint (color-matched)(Ensure sheen matches surrounding area)
- Paint tray and rollers (microfiber or short nap)(Use appropriate nap for wall texture)
- Painter’s tape(Protect adjacent surfaces and achieve sharp edges)
- Drop cloths or plastic sheeting(Contain dust and paint drips)
- Mild detergent solution(For pre-cleaning walls)
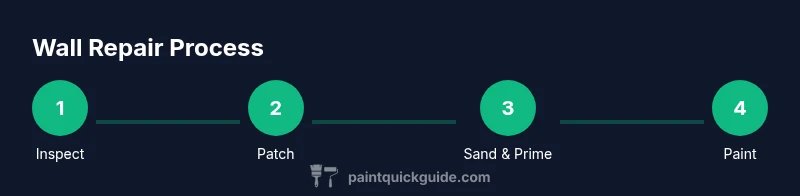
Steps
Estimated time: Total time: several hours, depending on patch size and drying conditions
- 1
Inspect the damage and plan
Survey the affected area, determine patch type, and gather tools. Decide whether the repair requires patch tape, spackling, or joint compound. Plan to protect floors and trim with painter’s tape and drop cloths.
Tip: Take a photo of the area before and after to compare color and finish later. - 2
Protect the area
Lay down drop cloths, seal off adjacent surfaces with painter’s tape, and remove loose paint with a gentle scrape. Ensure good ventilation to manage fumes during priming and painting.
Tip: Use a fan pointing away from the repair to keep dust from spreading. - 3
Clean and prep the surface
Wipe the surface with a mild detergent solution to remove dust and oils. Rinse with clean water and allow to dry completely before patching. Lightly sand the area to create a tooth for patching material.
Tip: A tack cloth is more effective than a regular rag for removing fine dust. - 4
Apply patching material
For small holes, apply a thin layer of spackling and smooth with the edge of a putty knife. For larger flaws, apply patch tape or mesh first, then cover with joint compound in thin layers, letting each dry before the next coat.
Tip: Always feather edges beyond the damaged zone to hide the repair. - 5
Sand the patched area
Once dry, sand the patch flush with the wall using 120–150 grit, then finish with 220 grit for a seamless surface. Wipe away dust after sanding.
Tip: Check for any high spots with a straight edge; sand those down gently. - 6
Prime the patched spot
Apply a thin coat of primer to seal the repaired area and improve color match. Allow to dry according to the product instructions before painting.
Tip: If the area is dark or stained, use a stain-blocking primer for best results. - 7
Match and apply paint
Mix or match your paint to the surrounding wall and apply in light, even coats. Feather the edges beyond the repair so the new color blends with the old. Allow each coat to dry completely.
Tip: Paint in the same lighting conditions as the room to judge color accuracy. - 8
Finish with a final coat
Inspect under different lighting and apply any final touch-ups. If needed, apply a second thin coat to achieve uniform color and sheen.
Tip: Avoid overworking the area to prevent lap marks. - 9
Clean up and cure
Remove protective coverings, clean tools, and ensure the area dries undisturbed for the recommended curing period. Reassess after 24–48 hours under room lighting.
Tip: Dispose of used materials properly per local regulations.
Your Questions Answered
Can I repair paint on wall without repainting the entire wall?
Yes. For minor damage, a well-executed patch with matching primer and topcoat can blend in with the surrounding wall. The key is proper prep, accurate color matching, and consistent sheen. Inconsistent patches are more noticeable under certain lighting, so test in multiple conditions.
Yes. Small fixes can blend in with careful patching, priming, and matching paint. Test in different lights to ensure consistency.
Is priming required after patching?
Priming is highly recommended after patching to seal the repair and improve adhesion of the final coat. Use a bonding or stain-blocking primer if you suspect bleed-through or if the area has stained or dark patches.
Priming after patching is strongly recommended to ensure good adhesion and color consistency.
How do I blend repair so the patch isn’t noticeable?
Feather the edges of the new paint beyond the patch, apply in very thin coats, and match the original sheen. Lighting matters, so check from different angles. A light glaze or the final topcoat can help unify the finish.
Feather the edges and apply thin coats. Check under various lights to ensure it blends well.
Can I reuse old paint for touch-ups?
If the old paint matches in color, sheen, and age, you can use it for touch-ups. Store paint tightly sealed and mix well before use to ensure color consistency. If you’re unsure, obtain a fresh sample to compare under your room lighting.
You can reuse old paint if it matches in color and sheen; mix well and test first.
What patching materials should I avoid?
Avoid cheap or lumped patches that dry unevenly. Do not use oil-based primers on interior latex systems unless recommended, and avoid over-saturating the wall with patching compounds that can cause cracking later.
Avoid poor-quality patches and incompatible primers to prevent future cracking or peeling.
Watch Video
Quick Summary
- Prepare the surface thoroughly before patching
- Choose the right patching material and primer
- Sand flush and test color under room lighting
- Apply thin, feathered coats to blend repair
- Allow proper curing before heavy use or cleaning