Floor Coating Epoxy Paint: A DIY Guide
Learn how to select, prep, apply, and maintain floor coating epoxy paint for durable garage floors. This PaintQuickGuide guide covers safety, curing, and basic maintenance for DIY projects.

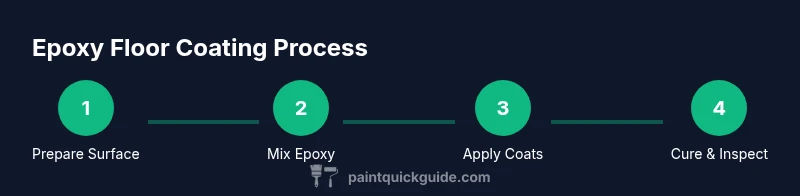
Apply floor coating epoxy paint successfully by selecting the right epoxy system, preparing a clean, sound substrate, and following a clear step-by-step process. This PaintQuickGuide guide explains prep, mixing ratios, application technique, curing times, and maintenance so homeowners can DIY with confidence. It highlights safety, ventilation, and common pitfalls to avoid.
What floor coating epoxy paint is and who should use it
Epoxy floors are a two-part system that, when mixed, forms a hard, chemical-resistant surface ideal for concrete garages, basements, workshops, and utility rooms. The floor coating epoxy paint creates a durable shield that resists abrasion, stains, and moisture, while offering color options and a glossy finish. According to PaintQuickGuide, epoxy floor coatings provide long-term protection and ease of maintenance for DIY enthusiasts who want professional-looking results without hiring a contractor. The PaintQuickGuide team found that proper surface prep, accurate mixing, and careful application are the biggest predictors of success for a DIY epoxy project. While floor coating epoxy paint is a strong choice for many spaces, outcomes depend on substrate condition, system selection, and adherence to instructions. This guide walks you through planning, prep, application, curing, and upkeep so you can achieve a durable result.
Benefits and limitations of epoxy paint for floors
Choosing a floor coating epoxy paint offers a combination of advantages and tradeoffs. The main benefits include exceptional durability, excellent chemical resistance, and a level, easy-to-clean surface that tolerates heavy foot traffic and occasional spills. Epoxy coatings can be tinted to match a color scheme, and with the right topcoat, they resist scratches and UV degradation. On the downside, epoxy floor coatings require careful prep and consistent conditions to reach full strength. They can be sensitive to moisture and temperature, and improper mixing or over-thick coats can lead to pinholes, odor, or longer curing times. For DIYers, the workflow is typically straightforward but demands patience and attention to detail to realize the floor coating epoxy paint’s full performance.
Surface prep: assessing and cleaning the substrate
Starting with a clean, properly prepared surface is the single most important step for a durable floor coating epoxy paint. Begin by removing dust, grease, and contaminants from the concrete. Mechanically grind or etch the surface if needed to create micro-abrasions that improve adhesion. Wipe and rinse thoroughly, allow full drying time, and ensure there is no surface moisture that could compromise bonding. If you’re applying over existing coatings, test adhesion first and consider removing old coatings that could delaminate under epoxy. A well-prepped substrate improves bond strength, reduces micro-cracking, and minimizes risks of peeling or bubbling when the floor coating epoxy paint cures.
Epoxy system types: choosing the right floor coating epoxy paint for your space
There are several epoxy configurations: 1-part, 2-part, and 100% solids systems, plus glossy or matte topcoats. Your choice depends on space use, traffic level, chemical exposure, and desired curb appeal. For residential garages and utility rooms, a two-part epoxy with a appropriate topcoat is common for a balance of durability and workability. Water-based systems offer easier cleanup and lower odor, while solvent-based and 100% solids options provide maximum hardness and chemical resistance. Selecting the right floor coating epoxy paint also involves considering cure time, pot life, and environmental conditions to ensure a solid, consistent finish throughout.
Safety, ventilation, and PPE when applying epoxy floor coatings
Working with floor coating epoxy paint requires good ventilation to reduce inhalation exposure to fumes. Use an appropriate respirator, eye protection, and chemical-resistant gloves. Keep pets and kids away from the workspace during mixing and curing. Read manufacturer Safety Data Sheets (SDS) for specific hazards, ventilation requirements, and disposal guidelines. Proper PPE and controlled ventilation help you complete the project safely and minimize health risks while achieving a professional-looking result with the floor coating epoxy paint.
Step-by-step overview: mixing, pouring, and rolling
A typical workflow involves accurate measuring of the resin and hardener, thorough mixing, and prompt application to use the epoxy’s pot life effectively. After mixing, pour the resin onto the floor in sections and spread with a roller or squeegee to avoid air bubbles. Apply a consistent, thin coat and back-roll to ensure uniform coverage, then allow curing before applying additional coats if required. The goal is a smooth, even finish without puddles, holidays, or gaps. This overview sets you up for the detailed step-by-step instructions that follow in the guide.
Curing, heat, humidity, and environmental conditions
Curing conditions influence the strength and appearance of the floor coating epoxy paint. Temperature, humidity, and airflow affect cure time, adhesion, and final hardness. Maintain a stable ambient temperature within manufacturer guidelines and minimize rapid temperature changes during curing. Opening windows or running ventilation can help, but avoid drafts that cause dust or debris to settle on the still-tacky coating. Do not rush the curing process; a properly cured floor offers the best durability and stain resistance for the floor coating epoxy paint.
Maintenance, cleaning, and long-term durability
A floor coating epoxy paint is designed for easy maintenance. Use a pH-neutral cleaner and a soft-bristle mop or microfiber pad to remove dirt and spills. Avoid harsh solvents that could dull the finish, and promptly wipe up chemical spills to prevent staining. Regular sweeping, occasional reseals, and addressing chips or scratches early can extend the coating’s life. With proper care, the floor coating epoxy paint maintains its appearance and protective qualities for years of service.
Cost considerations and budgeting for floor coating epoxy paint
Costs for floor coating epoxy paint vary with system type, square footage, and labor. In DIY projects, material costs typically scale with epoxy grade, color, and topcoat selection, while professional installation may add labor charges. When budgeting, consider prep materials, safety equipment, ventilation, and disposal costs in addition to the epoxy itself. While price differences can be meaningful, choosing the right system for your space and following best practices often yields the best long-term value for a floor coating epoxy paint project.
Tools & Materials
- Respirator mask(NIOSH-approved for organic vapors)
- Safety glasses or goggles(Eye protection against splashes and dust)
- Chemical-resistant gloves(Nitrile or neoprene)
- Mixing drill with paddle mixer(For resin and hardener Avoid metal blades that can corrode)
- Drill-compatible mixing paddle(Long enough to reach container center)
- Paint trays and rollers(3/8" nap for smooth concrete; extend reach with poles)
- Painter's tape(Edge protection and line definition)
- Drop cloths and plastic sheeting(Contain drips and protect adjacent areas)
- Degreaser/soap and scrub brush(Thoroughly remove oils and grime)
- Concrete etch or grinder(Profile the surface for better adhesion)
- Vacuum or broom(Clean up dust before coating)
- Solvent or water for cleanup(Follow solvent safety rules; ensure proper disposal)
- Thermometer or temperature meter(Monitor ambient temperature during cure)
- Ventilation fan (optional)(Enhances air exchange in tight spaces)
Steps
Estimated time: Estimated total time: 24-48 hours of active work, plus cure time as specified by the epoxy system.
- 1
Assess space and choose epoxy system
Evaluate room use, traffic, chemical exposure, and moisture risk to determine the appropriate epoxy system. Decide between 1-part, 2-part, or 100% solids epoxy based on performance needs and tolerance for odor. Select a topcoat option if you want extra durability or gloss.
Tip: Ensure your chosen system is compatible with concrete moisture levels and recoat windows; plan for venting during mixing. - 2
Clear area and protect surroundings
Remove movable items and protect walls, cabinets, and adjacent flooring with painter’s tape and drop cloths. Keep doors open for ventilation, but avoid strong drafts that can blow dust onto the wet epoxy.
Tip: Label exits and ensure lighting remains adequate for precise application. - 3
Clean and degrease the concrete
Sweep thoroughly, then scrub with a degreaser to remove oils and residue. Rinse well and allow the surface to dry completely before testing adhesion and continuing.
Tip: A spotless surface improves adhesion and reduces the risk of hazy finishes. - 4
Moisture testing and humidity control
If the space shows signs of moisture, perform a moisture test or consult the epoxy manufacturer’s guidelines. Delay coating if moisture risk is high, as humidity can cause bubbling and poor adhesion.
Tip: Work only when surface is dry and the air is not overly humid. - 5
Profile the surface (etch or grind)
Profile the concrete to create a rough surface that epoxy can bite into. Use mechanical grinding or chemical etching as appropriate for the substrate.
Tip: Avoid over-etching; you want good micro-roughness without creating deep crevices. - 6
Mix epoxy resin and hardener accurately
Following the manufacturer’s ratio, mix thoroughly until the color and consistency are uniform. Avoid whipping air into the mixture; scrape the sides and bottom of the container to ensure complete integration.
Tip: Use the recommended pot life and work quickly to prevent premature curing. - 7
Apply primer if required
Some systems require a primer for optimal adhesion or to seal porous concrete. Apply primer as directed, then let it cure for the specified time before proceeding.
Tip: Primer can help reduce pinholes and improve color uniformity in the final coats. - 8
Roll on the first coat, then back-roll second coat
Pour the epoxy and spread evenly with a roller, maintaining a wet edge to avoid lap lines. Roll in multiple directions to ensure even distribution and eliminate bubbles.
Tip: Keep coats thin and uniform; thick layers are prone to bubbles and longer cure times. - 9
Cure, inspect, and finalize
Allow the coating to cure under controlled conditions. Inspect for holidays, bubbles, or uneven areas and apply a second coat if needed after proper cure.
Tip: Don’t rush final inspection; curing completion is essential for durability.
Your Questions Answered
Is epoxy floor coating suitable for garages and basements?
Yes, epoxy floor coatings are widely used in garages and basements due to their durability and resistance to spills. Proper surface prep and following the manufacturer’s guidelines are key to success. Always consider moisture and load demands before choosing a system.
Yes. Epoxy floors work well in garages and basements when you prep the surface correctly and follow the instructions.
Do I need to etch or profile the concrete before applying epoxy?
In most cases, a proper profile improves adhesion. Mechanical grinding or chemical etching provides the surface texture epoxy needs to bond. Avoid skipping this step, as poor adhesion can lead to peeling.
You should profile the surface, usually by grinding or etching, to ensure the epoxy bonds well.
How long does epoxy floor coating take to cure?
Cure times vary with system and conditions. Expect several hours for initial set and a longer period for full hardness. Plan around cure windows and avoid traffic until the coating is fully cured.
Cure time varies, but wait until it’s fully cured before exposing the floor to traffic.
Can I apply epoxy over existing paint or coating?
Epoxy can be applied over existing coatings if adhesion is proven and the surface is properly prepared. In many cases, removing old coatings yields the best results for long-term durability.
You can, but you should test adhesion and likely remove old coatings for best results.
Is epoxy slippery when wet, and how can I prevent it?
Epoxy surfaces can be slick when wet if the finish is glossy. Choose a slip-resistant aggregate or a matte topcoat to improve traction. Regular cleaning also helps maintain grip.
Epoxy floors can be slick when wet; consider a non-slip topcoat or additive.
Watch Video
Quick Summary
- Prep the substrate thoroughly for best adhesion.
- Choose the epoxy system based on use and exposure.
- Apply coats evenly with attention to mixing and curing conditions.
- Maintain ventilation and safety throughout the project.