How to Paint and Seal Polymer Clay
Learn how to paint and seal polymer clay for durable, vibrant pieces. This step-by-step guide covers prep, paints, finishes, and common pitfalls, with practical tips for jewelry, miniatures, and decor. By PaintQuickGuide, 2026.

By the end of this guide, you will be able to paint and seal polymer clay for durable, colored pieces that resist handling and light wear. You'll learn prep steps, paint choices, and sealing options tailored to jewelry, miniatures, and decorative objects. Gather clean, fully cured clay, fine-grit sandpaper, acrylic paints, and a compatible sealant before starting.
Understanding polymer clay painting: basics
Polymer clay is a versatile medium that responds best to careful prep, compatible paints, and a reliable sealer. According to PaintQuickGuide, durable results start with fully cured, clean surfaces and paints designed for non-porous polymer surfaces. When you plan your project, identify whether you’re making jewelry, miniatures, or decorative items, and choose finishes accordingly. Base colors and accents will read differently after sealing, so test color combinations on scraps before committing to the final piece. Use acrylic paints, preferably those labeled for plastics or polymer clay, and apply in thin layers. Avoid oil-based paints, inks, or chalky finishes that can craze, peel, or not adhere well after curing. If you’re unsure about a pigment, test on scrap first and observe how it behaves under your chosen finish. Consider wear and contact: pieces handled daily benefit from a tougher sealant and smoother paint application. The PaintQuickGuide team emphasizes patience: allow ample drying time between coats and plan a final protective layer. That planning reduces touch-ups and yields durable results that stand up to everyday handling.
Surface prep for optimal adhesion
Paint adhesion starts with a clean, well-prepared surface. After curing polymer clay, remove any surface dust with a microfiber cloth. Lightly sand with a fine grit sponge (around 2000–3000 grit) to create micro-abrasions that help paint grip. Wipe away the dust again and let the piece rest a moment before painting. If the piece has shiny areas, a quick wipe with isopropyl alcohol will remove oils from your fingers that can repel paint. If you’re using dark colors or a light final layer, a thin base coat can even out the surface tone and reduce the number of coats needed later. Allow the base coat or primer to dry completely before proceeding. For best results, work in a well-ventilated area and protect your workspace with parchment or a silicone mat. Once the surface feels tack-free, you’re ready to start painting.
Painting options and techniques
Acrylic paints are the workhorse for polymer clay, offering a wide color range and drying clear. Use multiple thin coats rather than one thick layer to prevent cracking and uneven color. Start with a light base and build color through additional layers; for shading, apply darker tones into creases with a dry brush technique or a sponge for soft edges. For tiny details, switch to fine-tipped brushes and test color on a scrap piece first. For opaque confidence, mix a small amount of water or acrylic medium to improve flow, but avoid puddling. Water-based inks can also work for washes, but ensure they dry completely before sealing. When blending colors, keep your palette organized and label swatches. Consider the final finish—gloss, satin, or matte—for a piece that matches its purpose. Remember to test your finishes on a spare piece to see how the paint behaves under the sealant.
Sealing for durability and finish selection
Sealers protect paint from handling and UV exposure while shaping the final look. Choose a clear acrylic sealer labeled as safe for polymer clay, with options for matte, satin, or gloss finishes. Apply thin coats and allow each coat to dry completely before applying the next; two to three coats are typical. A matte finish reduces glare, while gloss enhances color vibrancy; satin is a balance between the two. If you’re coating jewelry or items that contact skin, use a water-based sealant to minimize odors and chemical exposure. It’s wise to test the sealant on a scrap piece first to evaluate adhesion and dry time. Note that some finishes can alter color slightly, particularly on darker clays, so plan accordingly. Finally, cure times vary by product; follow manufacturers’ directions, especially for air-dry vs. baked finishes. A light, even coat is safer than heavy coating that can pool or crack.
Troubleshooting and common mistakes
Common issues include cracking, peeling, or color migration between layers. Cracking tends to happen when layers are too thick or the clay was not fully cured, or when the paint dries too quickly in a hot environment. Peeling is common if the surface wasn’t properly cleaned or if the sealant wasn’t compatible with the paint. Color migration occurs when the sealant pulls color into the top layer; this is more likely with very dark underlayers or pigments that bleed. Prevent these problems with thin coats, adequate cure times, and compatible materials. Always test on a scrap piece first. If you notice tackiness after sealing, check that you’re using a sealing product compatible with acrylic paints; some sealants can stay sticky if applied too thickly or too soon after painting. Finally, protect drying pieces from dust and direct airflow that might lead to uneven finishes.
Verdict
The PaintQuickGuide verdict is clear: painting and sealing polymer clay can yield durable, vibrant pieces when you follow careful prep, thin layers, and compatible finishes. The team recommends starting with a fully cured piece, testing paints and sealants on scraps, and applying multiple light coats rather than one heavy layer. With these steps, your colors stay bright and your surfaces resist wear. If you’re unsure, revisit this guide and run a quick test patch. The PaintQuickGuide team’s approach prioritizes safety, compatibility, and patience to help hobbyists, crafters, and makers achieve professional-looking results.
Tools & Materials
- Polymer clay (unbaked blocks)(Choose colors and types suited to the project; bake according to package directions.)
- Fine-grit sanding sponge (2000–3000 grit)(Smooths surfaces after curing; avoid deep scratches.)
- Microfiber cloth(Lint-free dusting prior to painting.)
- Acrylic paints compatible with polymer clay(Prefer paints labeled for plastics or polymer clay.)
- Fine detail brushes (sizes 0–3)(Synthetic bristles recommended for clean lines.)
- Palette or mixing tray(For color blending and thinning.)
- Clear acrylic sealer (water-based)(Choose matte, satin, or gloss depending on finish.)
- Primer or polymer-clay-friendly base coat (optional)(Optional for dark clays or very smooth surfaces.)
- Parchment paper or silicone mat(Protects work surface and prevents sticking.)
- Isopropyl alcohol (optional for oils)(Use to clean surfaces with oily residues.)
- Soft detail tools (toothpick or needle)(For fine lines and texture.)
- Protective gloves and ventilation(Work in a well-ventilated area when using sealants.)
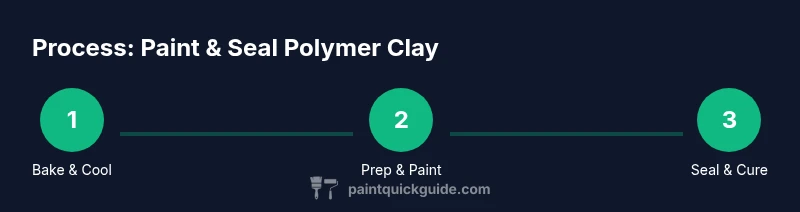
Steps
Estimated time: 60-120 minutes active work, plus drying times between coats and seals (up to 24 hours depending on products)
- 1
Bake the clay to full cure
Follow the manufacturer's instructions to bake until fully cured. Allow the piece to cool completely before painting to prevent warping.
Tip: Use parchment on the baking tray to prevent sticking. - 2
Lightly sand the surface
Gently sand the cured piece with 2000–3000 grit to create micro-abrasions for better paint adhesion. Wipe away dust when finished.
Tip: Wear a mask to avoid inhaling fine dust. - 3
Clean and prep
Wipe surfaces with a lint-free cloth and a small amount of isopropyl alcohol if you suspect oils from fingers remain. Let dry completely.
Tip: Ensure no residue remains before painting. - 4
Apply a base coat (optional)
If you’re painting dark clay or aiming for even tone, apply a thin base coat and let it dry fully before adding details.
Tip: Thin coats prevent hiding details. - 5
Paint with thin layers
Apply multiple thin coats rather than a single thick layer. Allow each coat to dry completely before the next.
Tip: Use a light touch to avoid brush marks. - 6
Add details and blend colors
Use fine brushes for details; blend edges gradually. Test colors on scrap pieces first for accuracy.
Tip: A damp brush helps smooth transitions. - 7
Seal the paint
Choose an appropriate clear sealer and apply in thin coats. Allow each coat to dry as directed by the product.
Tip: Avoid pooling; apply evenly. - 8
Final cure and storage
If the sealant requires curing, give it time before handling. Store away from direct sunlight and heat.
Tip: Label completed pieces to prevent confusion during storage.
Your Questions Answered
Can polymer clay be painted after baking?
Yes. Most hobbyists paint polymer clay after baking to ensure the surface is fully cured and stable. Test on scraps first and allow ample drying between coats, then seal for protection.
Yes. Painting after baking is common, with testing on scraps first and drying between coats.
What kind of paint should I use for polymer clay?
Acrylic paints labeled for plastics or polymer clay are ideal. They adhere well to cured clay and dry to a flexible, durable finish when sealed properly.
Acrylic paints designed for plastics are best for polymer clay.
Do I need a primer before painting polymer clay?
Primers are optional. Use a light base coat or primer if you’re covering dark clay or hoping for a very smooth surface, then paint after it dries.
Primers aren’t required, but they can improve adhesion on certain surfaces.
What sealant should I use after painting?
Choose a clear, polymer-clay-safe sealer. Decide between matte, satin, or gloss finishes and apply thin coats, allowing full cure between coats.
Use a water-based clear sealer in your desired finish, with multiple thin coats.
Is painted polymer clay food-safe?
Painted polymer clay should not be used for foods. Use the pieces for display, jewelry, or decor only, especially if sealed with non-food-safe finishes.
No—painted polymer clay is not food-safe; use for display or wear only.
How long does a sealant take to dry?
Dry times depend on the product. Generally, touch-dry times range from minutes to a few hours, with full cure taking up to 24 hours or more as directed by the manufacturer.
Dry times vary by product; expect anywhere from minutes to hours for touch-dry, with full cure up to a day.
Watch Video
Quick Summary
- Prepare cured surfaces for painting.
- Use thin layers for even color and better adhesion.
- Choose a compatible sealant and finish.
- Test colors and finishes on scraps first.
- Allow adequate curing time before handling.