How to Paint a Car Model: Step-by-Step Guide for Beginners
Learn how to paint a car model with a practical, beginner-friendly approach. This guide covers surface prep, primers, color application, masking, finishing, and long-term care for a showroom-worthy model. Practical tips from PaintQuickGuide.

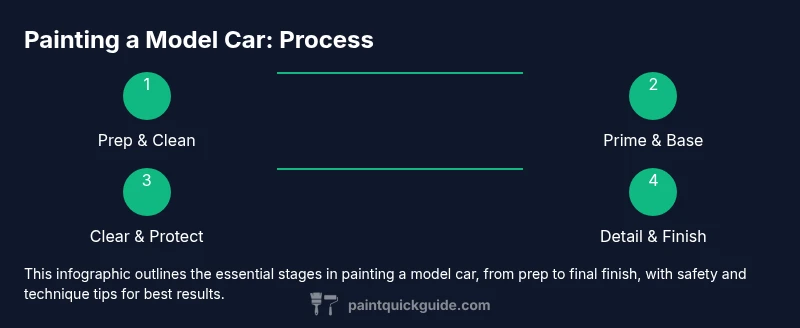
You can master painting a car model by following a structured process: prep the surface, apply primer, build color with base coats, add details, and finish with clear coats. Essential requirements include good ventilation, hobby-grade paints suitable for plastic, masking materials, and proper curing times. PaintQuickGuide recommends practicing on spare parts first.
Surface Prep: Cleaning and Degreasing
Before you start painting a car model, ensure the surface is clean and free of fingerprints, dust, and mold release residues. This initial step is foundational for a smooth finish on the final paint job. For many hobbyists, the most durable finish on a model car begins with careful cleaning and degreasing. When you plan to paint a car model, use mild soap and water, followed by a quick IPA wipe to remove oils. If you intend to paint glossy surfaces, a light sanding with very fine grit sandpaper (e.g., 600-800 grit) will help the paint adhere better. Consistent prep matters as you work through layers of paint to achieve uniform color. In the PaintQuickGuide methodology for painting a car model, surface prep is the most critical variable in long-term adhesion and appearance. Paint car model projects benefit from dedicated prep time, especially when working on complex parts with recessed details. A clean start also reduces the risk of fisheyes or speckling later in the process.
As you prep, plan your approach for masking edges and preserve detail like door handles or grill openings. The goal is to create a smooth, oil-free canvas. Keep your work area well ventilated and clean, and wear a respirator or mask when spraying aerosols. If you’re practicing, use spare parts to test your technique before applying paint to your main model, ensuring you can achieve even coverage on the intended surface. Remember, paint car model projects often hinge on the surface you’ve prepared, so invest time here.
In this step you’ll confirm the surface is ready for primer. By taking the time to inspect each seam, you’ll catch imperfections that could cause uneven color later on. If you notice any deep scratches, fill them with putty and sand flush once dry. The result will be a flatter, more uniform base for the primer layer. When you’re ready to proceed, you’ll see how the subsequent layers respond more predictably to your technique. This foundation supports all later color work and detailing.
Choosing the Right Paint System for a Car Model
Choosing the right paint system for a car model is essential for achieving a professional look. There are a few mainstream options: acrylic hobby paints, enamel paints, and lacquer-based systems. Acrylics are water-based, easier to clean, and widely used by hobbyists for their forgiving properties. Enamel paints offer a tougher, slightly longer dry time, which some builders prefer for handling and durability. Lacquers provide sharp, fast-drying finishes with a high-gloss peak, but they require proper ventilation and compatible solvents. When you're painting a car model, start with acrylics if you’re new, then experiment with enamel or lacquer as your technique matures. The choice of system will influence drying times, masking compatibility, and the look of the final finish. For most beginners, a basic acrylic base followed by a clear coat gives both flexibility and control.
If you plan to build a realistic look, consider the finish type: a satin or glossy topcoat can drastically alter the appearance of your paint car model. In addition to color choices, you’ll want to decide between airbrushing and brush painting. Airbrushing yields smoother coats and is favored for large surfaces or subtle shading; brush painting is simpler for smaller parts or detail work. Regardless of the system, always shake or mix paints thoroughly to ensure pigment consistency and color uniformity across the model car. The right paint system reduces chipping and improves adhesion to the primer base, which is critical for a long-lasting finish.
A practical tip is to keep a color chart and a few sample panels to compare shades under different lighting. You’ll quickly see how a color looks on your car model at various angles. Paint car model projects benefit from a test run on a similarly sized scrap piece to check pigment flow and drying behavior before committing to the main model. Always label your colors and cleaners to prevent cross-contamination between shades. Practicing with a dedicated set of colors helps you learn how different pigments interact with the primer and topcoat.
Primer, Sealer, and Adhesion
Primer is the unsung hero of a high-quality paint job on a car model. It fills tiny imperfections, enhances color accuracy, and improves adhesion between the substrate and the color coat. For plastic model kits, select a primer designed for plastic surfaces and compatible with your chosen paint system. A good primer will create a uniform texture, show up any remaining flaws, and provide a uniform base for color. When applying primer, use thin, even coats and allow adequate drying time between passes. Paint car model projects benefit from multiple light coats rather than a single heavy application, which can cause runs or gloss inconsistencies. If you’re using an airbrush, adjust the nozzle for a fine mist to avoid pooling primer.
Adhesion promoters can be helpful on difficult surfaces or when painting over certain plastics. A light coat of sealer after primer helps lock in the base, especially if you plan to apply decals or additional layers. A clear sealer can also minimize color shift during subsequent coats. After the primer has dried, inspect the surface for pinholes or rough patches and sand them lightly with very fine grit to ensure a flawless finish. You’ll want a smooth surface that accepts subsequent layers evenly. This step is vital to the overall look of your paint car model since the color depth and shine depend heavily on primer quality.
Before moving on, test the color against the base after priming on a spare part. A small discrepancy in color depth can be corrected by adjusting the primer shade or adding a light color glaze. The key takeaway is that primer and sealer decisions directly impact base color performance, masking, and light reflection. If you encounter issues like raised grain, re-sand and re-prime before continuing. This helps you achieve consistent results across all parts of the model car.
Color Application Techniques: Base Coats and Finishes
Base coats set the foundation for the final appearance of the car model. When painting a car model, apply thin, even layers to minimize paint buildup and avoid pooling. Regardless of color, multiple translucent coats are generally better than a single thick layer because they reduce brush marks and help color uniformity. If you’re using an airbrush, keep the nozzle at a consistent distance and move in smooth, overlapping strokes. For brush painting, use light pressure and multiple passes to build color gradually. In PaintQuickGuide’s experience, the most realistic results come from controlled layering and careful color matching between panels to avoid visible seams.
During color application, masking is essential to keep areas clean and sharp. Use precise masking tape or liquid mask to protect edges, chrome trim, and details. This is where the phrase paint car model gains practical meaning; you’ll be painting defined shapes and lines with accuracy. If you plan to decals or weathering, apply them after base color is fully dry and before the final clear coat. For some finishes, a slow-dry base allows deeper, richer color as pigment settles. When you finish the base color, allow ample time to dry per the paint’s instructions, then inspect for uniformity and coverage. If you notice tiny differences in shade, apply a light glaze to balance the overall color, again keeping coats thin to preserve detail.
Finish coats range from gloss to matte, depending on the look you’re after. A gloss finish can enhance color depth and highlight details, while a satin or matte finish reduces glare for a more realistic appearance. The choice of finish affects how decals appear and how weathering looks once applied. In any case, solvent compatibility between the base coat and clear coat matters. Always verify that you’re not using products that will cause the topcoat to wrinkle or peel. The goal is to achieve a smooth, uniform surface across every panel of your car model, with color depth that reads correctly under room lighting. This is the moment when careful technique translates to a premium hobby finish.
Detailing, Masking, and Edge Control
Detail work can elevate a model car from good to exceptional. After applying base color, you’ll use masking for precise edges, accents, and fine lines. Masking is a skill: it protects protected areas while you add highlights or second colors. When painting car model details, plan the order of operations so that you don’t damage already-dried layers. For example, masking off edges for decals or color separation helps maintain clean lines. In some cases, you may want to apply a fine brush for small details or use a decal set for more complex graphics. The trick is to keep edges crisp and to avoid feathering paint into adjacent areas. Good edge control makes the difference between hard-edged lines and soft, blurred shading, which might look less convincing on a scale model.
Weathering and panel line accents can create realism, but they should be used sparingly and with a steady hand. When you’re ready to seal the look, re-masking might be necessary to protect previously painted areas. In this stage, you’ll address any minor flaws from the masking or color transitions. A well-planned detailing approach adds depth and texture that helps the model car look accurately proportioned. Remember to let each color layer dry fully before applying masking or decals to avoid smudging. The end result should reflect careful planning and precise execution for a crisp, professional appearance.
Drying, Curing, and Post-Process Finishing
Drying and curing are crucial for a durable, long-lasting finish on the paint car model. After you’ve completed color and details, allow the layers to dry in a well-ventilated area away from direct sunlight or dust. The time needed depends on paint type and environmental conditions, but patience is essential; rushing can cause cracking or smudges. Once dry to the touch, a clear coat is typically applied to protect the color and add gloss or depth. For acrylics, a water-based clear coat often provides good protection without harsh solvents. If you’re using enamel or lacquer, ensure proper ventilation and follow safety recommendations for curing times. A proper topcoat also helps seal decals and safeguard against handling damage during display.
During the curing phase, avoid subjecting the model to handling or exposure to humidity, which can alter the finish. The final look depends on how well you manage curing times, with longer curing generally yielding better hardness and resistance to scuffs. After curing, a gentle polish can bring out the gloss and smoothness, particularly on larger flat panels. When cleaning the model afterward, use a soft brush or microfiber cloth and avoid harsh abrasives that could scratch the finish. This stage completes the process of paint car model work, providing a strong, stable surface ready for display or further detailing.
Troubleshooting Common Issues and Fixes
Even with careful technique, issues can arise when painting a car model. Common problems include paint runs, uneven coverage, masking bleed, and dust nibs. If you notice any of these, address them quickly with appropriate fixes. For runs, lightly wet-sand the affected area with ultra-fine grit sandpaper and re-apply a thin layer of primer before the base color. Uneven coverage often results from too-thick paint or inconsistent spray patterns; back off the spray distance and apply additional thin coats. If masking bleed occurs, re-mask and re-spray the affected area after the layer dries. For dust nibs, a gentle dusting with a clean brush can remove particles before re-coating. The key is to maintain control over the spray technique, choose compatible products, and test on scrap pieces whenever possible. When painting car model finishes, sometimes a micro-glaze can even out subtle imperfections; apply sparingly, and build up gradually.
Another common issue involves incompatibility between primers and topcoats. If you see incompatibility signs, you may need to strip the paint or reset layers by starting with a fresh primer. The PaintQuickGuide approach to troubleshooting emphasizes diagnosing the root cause—surface prep, primer, paint formulation, or topcoat selection—before attempting more coats. If odds are against you, stepping back to re-check each layer can save you time and materials. Finally, always follow the safety guidelines for ventilation and personal protective equipment when working with solvents or spray equipment, especially if you’re dealing with lacquer-based products.
Maintenance and Long-Term Care of Model Car Paint
Maintaining the finish on a painted model car requires careful handling and proper cleaning. Avoid abrasive cleaners that can scratch the clear coat and color layers. For routine cleaning, use a soft brush or microfiber cloth with mild soap and water. When displaying or storing your model, keep it away from direct sunlight and high humidity to prevent yellowing or color fading. If you notice micro-scratches over time, a light polishing with a model-safe compound can restore the surface without removing layers. For longer-term protection, consider a UV-resistant clear coat or a dedicated display sealant designed for scale models.
If you apply decals later or plan weathering effects, protect the painted surface with a fresh clear coat before adding any new details. This helps preserve the integrity of the base color and ensures decals adhere properly. The overall goal is to preserve the look and feel of your car model for years to come. Proper care and storage will extend the life of the paint and color, maintaining the impressive, showroom-like finish you achieved through careful planning and technique.
Tools & Materials
- Model car kit (plastic)(Include all parts to be painted; inspect for flash and imperfections)
- Hobby knife (number 11 blade)(Trim parts and cleanup flash before assembly or painting)
- Sanding supplies (400-800 grit)(Lightly smooth seams and imperfections before priming)
- Plastic primer (spray or brush-on)(Choose primer compatible with your paint system)
- Acrylic hobby paints (colors for base and accents)(Water-based, easy to clean; shake well before use)
- Enamel or lacquer paints (optional)(For faster drying or a hard finish; ensure proper ventilation)
- Clear coats (gloss/mata satin)(Protects color; choose finish based on desired look)
- Masking tape and liquid mask(Precise edges and edge protection during painting)
- Paint thinner/cleaner(Clean brushes; thin paints if needed)
- Brushes (assorted sizes)(For detail work and base coats; keep brushes reserved for painting only)
- Airbrush and compressor (optional)(For smooth, even coats on larger surfaces)
- Decal set and solvent (optional)(For intricate graphics; ensure compatibility with paints)
- Gloves, respirator, and eye protection(Safety gear for handling solvents and sprays)
Steps
Estimated time: 4-6 hours
- 1
Inspect and prep surfaces
Begin by inspecting all parts for mold release residue and flash. Clean with mild soap and water, then wipe with isopropyl alcohol to ensure a clean, oil-free surface. Lightly sand any seams or rough areas to create a uniform texture. Mask off areas you won’t paint. This prepares the surface for primer and prevents adhesion issues on the paint car model.
Tip: Work in a well-ventilated space; smaller parts can be cleaned with a Q-tip for precision. - 2
Sand and seam-fill as needed
Sanding helps create a smooth base and minimizes brush marks. If you find deep scratches, apply a small amount of model putty, let it dry, then re-sand to flush. Re-check the surface under good light to catch any remaining imperfections that could affect color evenness. Continue to mask edges where needed.
Tip: Use fine grit gradually; avoid over-sanding which may remove fine details. - 3
Apply primer
Apply thin, even coats of primer designed for plastic; aim for a uniform layer that covers all surfaces without pooling. Let the primer dry completely before moving on to color. Lightly re-sand if you notice any imperfections after the primer.
Tip: Keep a consistent distance from the model if using an airbrush to avoid runs. - 4
Base coat application
Apply the base color in thin, even layers. Build color gradually with multiple passes rather than one thick coat to reduce hiding and ensure even coverage across all panels. Allow each coat to dry before applying the next.
Tip: Test on a scrap piece first to calibrate spray or brush technique for the paint car model. - 5
Detailing and masking
Mask off areas for decals, trim, or stripe work. Add details with fine brushes and steady hands; for large color blocks, use masking tape or liquid masks to maintain crisp edges. Ensure base color is fully dry before decals to prevent silvering or misalignment.
Tip: Save a little base color to touch up any masking lines after decals. - 6
Apply clear coats
After color is fully dry, apply a clear coat to protect the finish and achieve the desired gloss level. Use thin, even coats and allow ample drying time between passes. For a deeper, more realistic look, consider a second clear coat after the first has cured.
Tip: Avoid heavy coats that can cause runs or orange peel. - 7
Final checks and polishing
Inspect the finished surface for any nibs or dust. Lightly polish with a model-safe compound to enhance gloss and evenness. Remove masking residue and re-check for any flaws. Store the model in a dust-free area until you’re ready to display the paint car model.
Tip: Store with a cover or display case to protect the finish from dust. - 8
Curing and long-term care
Let the model cure fully before handling; curing times depend on the paint system. Once cured, clean with a soft brush for dust and avoid abrasive cleaners. Proper storage extends the life of the paint car model’s finish.
Tip: Avoid touching the surface during curing, as oils can impact adhesion.
Your Questions Answered
What type of paint is best for plastic model cars?
Acrylic paints are popular for plastic model cars because they’re easy to clean, low odor, and water-based. Enamel and lacquer offer tougher finishes but require more ventilation and careful handling. Start with acrylics and test compatibility with primers and clear coats.
Acrylics are easiest for plastic models; enamels and lacquers can give tougher finishes but need ventilation and testing.
Do I need an airbrush to paint a model car?
An airbrush provides smoother coats and easier color blending, especially on larger surfaces. You can still achieve excellent results with brushes, but it may require more time and technique to avoid brush marks.
An airbrush helps, but brushes can work if you take your time and layer thin coats.
How long does it take for the paint to dry and cure?
Drying times vary by paint type and environment. Plan for several hours between coats, and allow full curing time as recommended by the paint manufacturer before handling or applying decals.
Dry times depend on the product; plan for several hours between coats and full cure before handling.
How can I fix a bad paint job on a model car?
If you’re unhappy with the result, you can carefully strip the paint and start again, or sand the affected area lightly and re-prime before applying color. Practice on scrap parts to minimize waste.
If the finish isn’t right, strip and start over or re-prime and repaint the affected area.
Can decals be applied over paint, and how to protect them?
Decals should be applied to a fully cured base color. After decals, seal with a clear coat to protect them and prevent silvering. If decals silver, re-wet and re-position before final sealing.
Yes, decals go on after the base color dries; protect them with a clear coat.
What safety precautions should I follow when painting a model car?
Work in a well-ventilated area, wear a respirator and eye protection, and follow product-specific safety guidance for solvents and spray products. Store paints safely and keep away from heat sources.
Always vent the area and wear protective gear when spraying or handling solvents.
Watch Video
Quick Summary
- Prepare surfaces thoroughly before painting.
- Use thin coats for even color buildup.
- Mask edges precisely to protect detail work.
- Allow adequate drying and curing between layers.
- Finish with a protective clear coat for durability.