Lead Paint Removal: Safe, Practical How-To for Homes
A practical, safety-first guide to remove lead based paint from homes. Learn PPE, containment, removal methods, disposal, and regulatory tips for DIYers and homeowners.

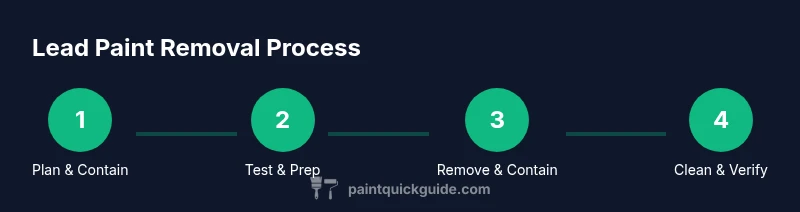
Removing lead-based paint is a safety-critical task. This quick guide helps you remove lead based paint safely by outlining essential steps, PPE, containment, testing, removal methods, and waste disposal to protect your household. By following PaintQuickGuide's practical approach, homeowners can plan a compliant, low-risk process that minimizes dust and exposure. Verify local regulations before you begin.
Why removing lead-based paint matters
Lead-based paint hazards are a serious concern in older homes. Cracked or peeling paint can release lead-containing dust that children and pets may inhale or ingest. According to PaintQuickGuide, reducing exposure means controlling dust, avoiding disturbance of painted surfaces, and using proper removal strategies. If you plan to remove lead based paint, proceed with caution and plan containment to protect occupants. Treat any uncertain paint as potentially hazardous and set up safe work zones. Early planning reduces future risks and makes post-removal repainting safer and more predictable.
Safety-first considerations and PPE
Work with lead-based paint requires strict safety measures. Before you start, ensure you have appropriate PPE: an NIOSH-approved respirator with HEPA filters, disposable coveralls, splash goggles, and chemical-resistant gloves. Hair covers and shoe booties help keep contaminants from spreading. Use a HEPA-filter vacuum for cleanup and avoid dry sweeping, which can send dust into the air. Protect nearby residents by sealing doors and vents with plastic sheeting and posting warning signs to minimize exposure for children and pets. PaintQuickGuide emphasizes that proper PPE and containment are the foundation of a safe removal project.
Preparation, containment, and testing
Preparation begins with a clear plan and a contained work zone. Lay down multiple layers of plastic sheeting, seal off the room, and cover floors and adjacent surfaces. If possible, create a negative air environment by using one-way air flow or temporary exhaust with an appropriately rated filter. Testing for lead paint before disturbance is ideal; if testing is unavailable, treat any older paint as a potential risk and proceed with lead-safe removal methods. Always have a dedicated waste bag system and labeled containers for lead-contaminated debris. PaintQuickGuide recommends documenting test results and containment setup to guide disposal and compliance.
Removal methods and disposal options
There are several methods to remove lead-based paint, each with its own dust control considerations. Wet scraping or wet sanding minimizes dust compared with dry methods. Chemical strippers can soften paint for easier removal but must be used according to label directions and with proper ventilation. Encapsulation is a viable alternative for surfaces with tightly bonded paint or where removal would cause excessive dust. Sanding, grinding, or using heat guns on lead-painted surfaces without proper controls can release hazardous dust and fumes and should be avoided. After removal, carefully seal and bag debris in leak-tight containers and arrange for hazardous waste disposal per local regulations. Clean all tools and surfaces with a damp cloth and re-test the area for residues.
Post-removal checks and repaint prep
After removal, perform a thorough clean-up to ensure no lead dust remains. Use a HEPA vacuum on all surfaces, followed by damp-wipe cleanings of walls, trim, and overhead areas. Re-test the space or hire a certified professional to confirm the area is safe before repainting. When you repaint, select low-VOC, lead-safe paints and use clean, dedicated tools for the project to prevent cross-contamination. Finally, dispose of all PPE and contaminated materials according to local regulations, and store your documentation for future reference.
Practical considerations for homeowners
Real-world projects vary in complexity; some spaces may require professional remediation due to extensive contamination or structural vulnerabilities. If you opt to DIY, allocate time for safe containment, disposal, and post-removal verification. Keep children and pregnant persons away from the work area, and communicate timelines with household members to minimize disruption. PaintQuickGuide suggests budgeting for quality PPE, proper disposal, and potential professional consultations if tasks exceed safe DIY limits. Remember, safety and compliance are the priorities when removing lead-based paint.
Tools & Materials
- NIOSH-approved respirator (with P100 filters)(Fit-tested if possible; replace filters as needed)
- Disposable coveralls(Covers clothing; choose a breathable but protective material)
- Safety goggles(ANSI Z87.1 compliant)
- Nitrile gloves(Double-gloving recommended)
- Hair cover and shoe covers(Minimize tracking of dust)
- Drop cloths (6-mil or thicker)(Plastic sheeting to contain dust)
- Plastic sheeting for containment(Seal doors and vents)
- HEPA-filter vacuum(Certified; use for cleanup)
- Wet-scraping tools (putty knives, blades)(Sturdy, non-sparking if possible)
- Chemical stripper or encapsulant (lead-safe)(Follow label instructions)
- Damp cloths and sealable bags(For final wipe-downs and waste)
- Waste containers labeled for hazardous waste(Sealed, leak-proof)
- Test kit for lead (optional)(EPA- or state-approved if available)
Steps
Estimated time: Estimated total time: 2-6 hours
- 1
Assess area and establish containment
Identify the scope, seal off the room, and set up a plastic barrier to prevent dust spread. Establish an exit workflow to minimize cross-contamination and protect occupants. Pro tip: confirm containment with a quick sweep to ensure dust won’t escape.
Tip: Create a dedicated waste path that avoids crossing through other rooms. - 2
Test and interpret lead presence
Use a lead test kit if available to determine whether lead-based materials are present. If unsure, treat the paint as potentially hazardous and follow lead-safe practices. Pro tip: document results for future reference.
Tip: If in doubt, assume lead and proceed with precautions. - 3
Don PPE and prepare area
Put on respirator, disposable coveralls, goggles, and gloves. Lay down drop cloths and seal the space with plastic sheeting. Pro tip: ensure ventilation is controlled to avoid dust escape.
Tip: Inspect PPE fit and ensure no gaps before starting. - 4
Choose and prepare removal method
Decide on wet scraping, chemical stripping, or encapsulation based on surface type and risk. Prepare tools and follow the product instructions meticulously. Pro tip: never sand dry lead-based paint; it creates hazardous dust.
Tip: Water misting during scraping reduces dust. - 5
Execute removal with dust control
Proceed in small sections, keep surfaces wet, and use a HEPA vac after each stage. Contain debris in labeled bags and avoid spreading dust to adjacent areas. Pro tip: work methodically to minimize recontamination.
Tip: Work slowly to maintain control over dust and debris. - 6
Clean up, dispose, and verify safety
Clean tools and surfaces with damp cloths; seal and label waste as hazardous. Have area re-tested or inspected by a professional if needed before repainting. Pro tip: keep a record of disposal and post-removal checks.
Tip: Do not mix waste streams; separate debris from regular trash.
Your Questions Answered
Can I remove lead-based paint myself?
DIY removal is possible for small, well-contained areas if you follow strict safety protocols and local regulations. Larger or heavily contaminated sites typically require professional remediation. Always assess risk before starting.
DIY removal is possible for small areas if you follow safety rules; consult professionals for large or heavily contaminated sites.
What PPE do I need for cleaning up lead paint?
You should wear a properly fitted respirator with HEPA filters, disposable coveralls, safety goggles, gloves, and shoe covers. Use a HEPA vacuum for cleanup and avoid dry sweeping to minimize airborne dust.
Wear a respirator with HEPA filters, coveralls, goggles, gloves, and shoe covers; clean with a HEPA vacuum.
Is encapsulation a safe alternative to removal?
Encapsulation can be a safe alternative when removal would cause excessive dust or damage. It seals the paint rather than removing it, but it requires proper surface preparation and ongoing maintenance.
Encapsulation can work when removal is too risky; it must be properly applied and maintained.
How should lead-contaminated waste be disposed of?
Lead-contaminated waste must be sealed in labeled, leak-proof containers and disposed of according to local hazardous waste regulations. Do not mix it with regular trash or recycling.
Seal the waste, label it, and follow local rules for hazardous waste disposal.
How long does lead paint removal take in a typical room?
Time varies by area size, surface condition, and removal method. Plan for several hours and consider professional help for larger projects to ensure safety and compliance.
It depends on the room size and method; plan for several hours or more for larger spaces.
Are there safer modern alternatives to removal?
Yes. Encapsulation or enclosure can be used where removal isn’t practical. Always evaluate long-term safety, maintenance, and regulatory requirements before choosing an alternative.
Encapsulation or enclosure can work when removal isn't practical; assess safety and rules first.
Watch Video
Quick Summary
- Plan containment before starting removal.
- Use proper PPE and dust-control methods.
- Choose removal method carefully; avoid dry sanding.
- Dispose of waste per local hazardous waste rules.
- Verify area safety before repainting.