Paint Terracotta Plant Pots: A Practical Guide
Learn how to paint terracotta plant pots with confidence. This step-by-step guide covers prep, priming, painting, sealing, and maintenance for durable, stylish pots for indoor and outdoor use.

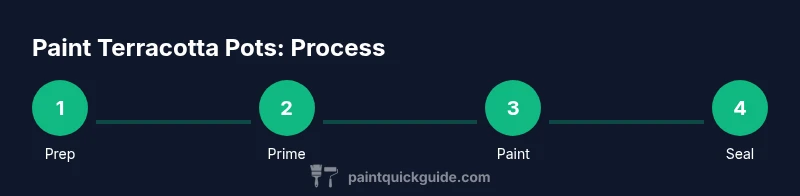
By following a simple, four-coat process you can paint terracotta plant pots to look fresh for seasons. Start with a thorough cleaning, then prime with a bonding primer, apply two coats of exterior acrylic paint, and finish with a clear sealer. For outdoor pots, choose UV-resistant acrylics and ensure surfaces are fully dry between coats. PaintQuickGuide recommends outdoor-safe products for durability.
Why paint terracotta plant pots
Terracotta pots are a staple in homes and gardens due to their natural look and excellent porosity. They wick moisture, regulate soil temperature, and have a classic warmth that fits many decors. However, their porous surface also makes them prone to moisture absorption, mineral leaching, and weathering when used outdoors. Painting terracotta plant pots provides a decorative upgrade while adding a protective barrier that reduces water absorption and prolongs color longevity. According to PaintQuickGuide, painting terracotta plant pots is a cost-effective way to refresh a garden or indoor display while protecting the porous clay from moisture and mineral buildup. With the right primer, paint, and sealant, you can create durable, wipe-clean finishes or vivid designs that resist sun and rain. The key is choosing compatible products that flex with temperature changes and humidity, so the paint doesn’t crack or peel. When you start this project, set clear goals for finish (matte, satin, or gloss) and intended environment (indoor shelves, sunny patio, or shaded porches), so you select the right paints and sealants for lasting results. PaintQuickGuide emphasizes that durability starts with prep, not just color. The best outcomes come from clean surfaces, correct primer, and a proper topcoat. Keep in mind the pot’s drainage holes and soil drainage, which affect moisture management around the painted surface. A well-prepped terracotta pot paints best and ages gracefully with minimal maintenance.
Color ideas and finishes
Choosing colors for terracotta pots is about balance: you want color that complements plants while protecting the pot. Start with a base that suits bright herbs or flowering annuals—soft pastels for herbs, rich jewel tones for flowering varieties, or a metallic edge for contemporary displays. For DIY ease, acrylic paint is preferred because it adheres well to terracotta when properly primed. Chalk paint offers a matte, velvety finish that can be easily distressed for a vintage look, while mineral-based paints provide a durable, breathable coating that works well in outdoor settings. When considering finishes, decide between matte, satin, or gloss to match your décor. You can even create effects like gradient ombrés, stripes, or stencils for a personalized garden feature. If you want a weather-ready setup, pair your chosen color with a UV-resistant topcoat to guard against sun fading. PaintQuickGuide suggests testing a small sample on the pot’s bottom edge before committing to a full pot, ensuring you like the color and finish in natural light. For terracotta lovers who enjoy quick updates, success often comes from layering thin coats rather than a single heavy application; this prevents cracking and helps the color stay even across the pot's curved surface. Keep in mind that lighter colors reveal any moisture more quickly, so sealants are particularly important when pots are used outdoors.
Surface prep before painting
Surface prep is the unsung hero of a durable paint job on terracotta. Start by removing dirt, dust, and salts that accumulate on the surface, especially if pots have sat outside. Wash pots with warm water and mild dish soap, then rinse and air-dry completely. Any stubborn mineral deposits or chalky residues can be lightly scrubbed with a mixture of water and white vinegar, then rinsed. Sanding the outer lip and any rough patches with fine 220-grit sandpaper smooths the surface and increases paint adhesion. After sanding, wipe the pots with a damp cloth and let them dry fully. Moisture trapped under layers of paint can lead to blistering, so ensure drying times are ample before priming. For best results, apply a bonding primer designed for porous surfaces. A primer helps seal micro-pores, improves paint grip, and reduces edge wear on curved surfaces. If you’re painting several pots, label colors and keep your workspace organized to avoid cross-contamination. Finally, check drainage holes to ensure the primer can cure evenly and don’t seal them closed, as proper drainage is essential for plant health. PaintQuickGuide reminds readers that a thorough prep saves time later and yields a flawless finish.
Tools & Materials
- Exterior acrylic paint (water-based)(Choose UV-resistant formula for outdoor pots; multiple colors optional for designs)
- Bonding primer for porous surfaces(Helps paint adhere to terracotta and reduces peeling)
- Paint brushes (flat and fine-detail)(Synthetic bristles for better control; 1–2 inch wide for pots, smaller for designs)
- Foam roller or sponges(For smooth, even base coats on larger pots)
- Painter's tape(Creating clean lines and geometric patterns)
- Fine-grit sandpaper (220 grit)(Smooths edges and improves primer adhesion)
- Mild soap, bucket, sponge(For initial cleaning before priming)
- Sealant/topcoat (clear, outdoor-rated)(Choose a breathable sealant to avoid trapping moisture)
- Masking materials and drop cloths(Protect surfaces around pots during painting)
- Optional spray sealant or spray paint(For fast coverage or specific effects; use outdoors only)
Steps
Estimated time: 2-5 days (including drying and curing)
- 1
Prepare the pots
Remove dirt and residues; wash with mild soap, rinse, and allow to dry completely. This ensures the primer adheres well and prevents staining under the paint.
Tip: Wear gloves and work in a ventilated area; sunlight speeds up drying but can cause uneven curing. - 2
Lightly sand edges
Use 220-grit sandpaper to smooth rough patches and the rim, then wipe clean to remove dust. Smoothing edges improves paint adhesion and reduces edge wear.
Tip: Avoid removing the pot’s natural texture; just degloss the surface. - 3
Apply bonding primer
Coat the entire outer surface with a thin, even layer of primer. Let it dry following the manufacturer’s timing; this step is essential on porous terracotta.
Tip: Tape off the rim if you want a clean color border. - 4
Base coat with exterior acrylic
Apply the first light base coat; let it dry fully before applying a second coat for even color. Thin coats reduce drips and pooling on curved surfaces.
Tip: Paint in long, smooth strokes; avoid overloading the brush. - 5
Add designs or multiple colors
Use painter’s tape or stencils to create patterns. Allow each color to dry before applying the next to avoid color bleed.
Tip: Test color combos on a scrap surface before applying to the pot. - 6
Seal and cure
Apply a clear, outdoor-rated sealant to protect the finish. Allow full cure time according to the sealant’s instructions before pot exposure to moisture.
Tip: Cure indoors if possible for the first 24–48 hours; avoid heavy rain during curing.
Your Questions Answered
Do I need to seal terracotta pots after painting?
Yes. A clear, outdoor-rated sealant protects the paint from moisture and UV exposure and helps the finish last longer. Ensure the pot is fully dry before sealing.
Yes—seal with an outdoor-rated topcoat after the paint dries completely to protect it from moisture and sun.
What type of paint is best for terracotta pots?
Exterior acrylic paints are a reliable choice when paired with a bonding primer. They resist fading and peeling better than many other options for outdoor use.
Exterior acrylics with primer work best for outdoor terracotta pots.
Can I paint pots with a design or stencil?
Absolutely. Use painter’s tape or stencils and allow each color to dry before applying the next to avoid color bleed. Test on a scrap piece first.
Yes, designs and stencils are great; dry each color before adding the next.
Will painted pots withstand outdoor weather?
With proper priming and a UV-resistant sealant, painted terracotta pots can endure outdoor weather for several seasons. Reapply topcoat as needed after heavy sun exposure.
Durable with primer and a UV sealant, but check and recoat as needed.
How long does paint last on terracotta?
Longevity depends on exposure and care; outdoor pots last longer with sealant and regular maintenance. Expect years, not months, with proper prep and sealing.
Proper prep and sealing extend how long the paint lasts.
Can I use spray paint for terracotta pots?
Spray paint is convenient but can require more even sanding and priming to prevent runs on curved surfaces. Outdoors, use cans designed for exterior use and seal afterwards.
Spray paint works, but you’ll still want primer and a sealant.
Watch Video
Quick Summary
- Prepare thoroughly: clean, dry, and lightly sand terracotta for best adhesion.
- Prime with a bonding primer to prevent peeling on porous surfaces.
- Use exterior acrylics and a breathable sealant for outdoor durability.
- Finish with color and sealing layers, then allow full curing for longevity.