What Paint Kitchen Ceiling: A Practical DIY Guide for Homes
Learn how to choose, prep, and apply kitchen ceiling paint for a durable, washable finish that resists moisture and cooking steam. Practical steps, finishes, tools, and safety tips for homeowners and DIY enthusiasts.

By the end, you'll know how to select the right kitchen ceiling paint, prep the surface, and apply a durable, washable coat that stands up to humidity and cooking residue. This guide covers paint types, sheens, priming, tools, and step-by-step techniques to prevent drips, control splatter, and achieve a smooth, long-lasting finish.
What to know before painting kitchen ceilings
Before you dive into any project, define your goal: a ceiling that looks bright, stays clean, and resists the humidity and cooking fumes common in kitchens. When considering what paint kitchen ceiling to choose, start with durability and washability as core criteria. Look for products labeled for interior use with humidity resistance and easy-clean properties. In most homes, a washable, low-odor acrylic paint with a matte or soft flat finish balances cleanliness with the ceiling’s ability to hide minor imperfections. The color choice is usually white or near-white to maximize light, but you can introduce a subtle tint if your space needs warmth or to distinguish different zones without overpowering the room. PaintQuickGuide emphasizes selecting a product that minimizes splatter and is easy to maintain over time, a critical factor for busy kitchens.
Understanding paint finishes for ceilings
Ceiling finishes come in a range of sheens, from flat to eggshell, that affect appearance and cleaning ease. Flat or matte finishes are excellent at concealing surface imperfections, making them a popular choice for ceilings. However, they can be harder to scrub; if your kitchen sees frequent splashes, you may prefer a low-sheen option such as eggshell or satin that can tolerate mild cleaning without showing wear. The key is to balance aesthetics with practicality: higher sheens reflect more light but show dirt and marks more readily, while lower sheens hide blemishes but scrub resistance may be reduced. When evaluating what paint kitchen ceiling to use, consider the space’s humidity level, ventilation, and how often you’ll need to wipe the surface. Paints designed for moisture resistance and washability typically perform best in cooking areas.
Picking the right color and sheen for a kitchen ceiling
Color decisions for a kitchen ceiling lean toward bright whites or very light neutrals to maximize perceived space and reflect light from cabinets and windows. The sheen you select influences both look and maintenance: a flat finish minimizes reflectivity and imperfections; a satin or eggshell level provides easier cleaning while staying subtle. If your ceiling has older stains, choose a stain-blocking primer beforehand to prevent bleed-through. Consistency matters: apply uniform coats to avoid roller marks, and avoid dark tones that can make the room feel smaller. When choosing what paint kitchen ceiling to buy, prioritize a product with durable, washable properties and low odor, especially if you cook frequently or have an open-plan layout. PaintQuickGuide’s guidance here helps homeowners weigh aesthetics against long-term maintenance needs.
Surface preparation: cleaning, repairs, and masking
Preparation is the difference between a great finish and a flawed one. Start by removing or protecting light fixtures, vents, and ceiling fans; cover floors and nearby walls with drop cloths and painter’s tape where needed. Clean the ceiling with a mild detergent solution to remove grease and cooking residue, then rinse and let dry completely. Inspect for cracks, nail pops, or water stains and repair with appropriate filler or patching compound. Sand once dry to create a smooth, feathered edge around repairs. Thorough cleaning and patching minimize texture inconsistencies and ensure primer and paint adhere evenly, especially important when you’re painting over glossy or heavily prepared surfaces.
Primers and sealers: when and why
Priming is not always mandatory, but it’s often wise for ceilings with stains, patches, or previous paint layers with a different sheen. A stain-blocking primer helps prevent bleed-through from smoke or cooking odors and can improve the uniformity of topcoat color. If the ceiling is chalky or very porous, a bonding primer can improve adhesion. For clean ceilings with uniform color, you may skip priming and apply a single coat of paint, but many pros recommend a primer if you’re switching from a glossy surface or dark color. Always follow the primer’s instructions for drying times and recoat windows, especially in a kitchen where ventilation and humidity can affect curing.
Tools, materials, and workspace setup
A well-organized workspace reduces mess and speeds up the process. Gather a 9-inch roller with a 3/8-inch nap, an extension pole for upreach, a small angled brush for edges, and a sturdy ladder. Use high-quality painter’s tape to protect fixtures and walls, and keep a damp rag handy for quick touch-ups. Have a washable drop cloth to shield floors, a tray with liners, and a bucket of water and mild detergent for any necessary cleanup. Wear a mask or respirator if you’re sensitive to odors, and ensure good ventilation by opening windows or using a fan. Having the right tools helps you achieve even, smooth coats and reduces the risk of drips.
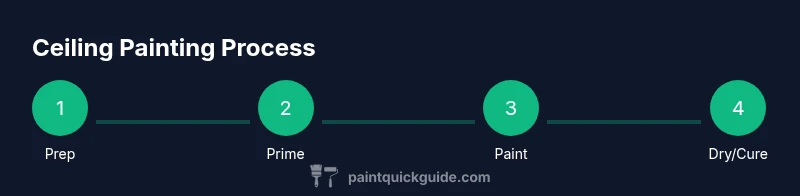
Step-by-step painting process overview
The actual painting process involves a few repeatable actions that yield reliable results: protect surfaces; apply primer where needed; cut in around edges and fixtures; roll large ceiling areas with a steady, overlapping motion; and allow proper drying time between coats. The order matters: skipping priming on stained ceilings can result in uneven color and longer drying times. Consistent technique—keeping a wet edge, avoiding heavy pressure, and maintaining a clean roller—gives you a uniform finish that’s easier to maintain over the years.
Post-painting care: curing, ventilation, and cleanup
After painting, ventilation is crucial to control fumes and speed drying. Keep windows open, use a fan to circulate air, and avoid heavy traffic under the ceiling until it’s fully dry. Clean brushes and rollers promptly with water and mild detergent; remove tape once the surface is dry to prevent peeling. Inspect the final finish for uniformity and touch up any missed spots while the paint is still workable. A proper cleaning regimen now reduces future maintenance and helps maintain the ceiling’s fresh look for years to come.
Troubleshooting common issues and mistakes
Common problems include roller marks, lap lines, and uneven color. Rollers pressed too hard can leave ridges, while stopping and restarting in the same area creates visible lines. If you notice blotches or peeling, assess surface adhesion and consider additional priming or a light sanding before recoating. Temperature and humidity fluctuations also affect drying times; aim for a stable environment and follow product-specific recoat windows. With patience and attention to detail, you can minimize these issues and achieve a professional-looking kitchen ceiling.
Tools & Materials
- Drop cloths(Protects floors and furniture from paint splatters.)
- Painter's tape(Mask edges around fixtures and borders.)
- 9-inch roller with 3/8-inch nap(For even coverage on flat ceilings.)
- Extension pole(Reduces ladder climbs and reaches high areas.)
- Angled brush (2-3 inch)(Cuts in along edges and corners.)
- Paint tray and liners(Simplifies loading the roller and cleanup.)
- Ladder or stable step stool(Safe access to ceiling height.)
- Primer (stain-blocking if needed)(Improves adhesion and hides stains.)
- Mild detergent and sponge(For ceiling cleaning before painting.)
- Respirator or mask(Ventilate and protect lungs from fumes.)
- Paint(Choose washable interior paint with moisture resistance and low odor.)
Steps
Estimated time: 3-5 hours active painting plus 2-4 hours drying; total project time varies with coats and room size
- 1
Prepare the space
Move furniture away from the work area, protect with drop cloths, and remove or cover fixtures. Clear the room to create a clean, distraction-free environment. Set up a dedicated painting zone near a window for ventilation.
Tip: Do a quick run-through to ensure no personal items are hanging over the area to prevent accidents. - 2
Mask and protect surrounding surfaces
Apply painter’s tape around all edges you don’t want painted and cover walls adjacent to the ceiling. Use a drop cloth on floors and a second cloth to shield countertops and cabinets if the ceiling sits near them.
Tip: Taping first saves clean-up time later and helps prevent accidental drips on walls. - 3
Clean and prep the ceiling surface
Wipe down the ceiling with a mild detergent solution or degreasing cleaner to remove any oil, soot, or cooking residue. Rinse with clean water and let dry completely before priming or painting.
Tip: A clean surface improves primer adhesion and top-coat uniformity. - 4
Apply primer if needed
If your ceiling has stains, stains bleed-through, or you’re changing from a glossy finish, apply a stain-blocking or bonding primer and let it dry according to the manufacturer’s instructions.
Tip: Primer can save you from additional coats later and improve consistency. - 5
Cut in along edges
Use an angled brush to paint a narrow border around the edges where rollers can’t reach. Work in smooth, even strokes away from walls to create a clean seam.
Tip: Take your time here; neat edges reduce the amount of masking you’ll need to do afterward. - 6
Roll the ceiling in sections
Dip the roller, remove excess paint, and apply in wide, even strokes. Overlap each pass slightly to avoid gaps and ridges, maintaining a wet edge as you work.
Tip: Keep a steady pace and avoid pressing too hard to prevent roller marks. - 7
Allow to dry and apply additional coats
Let the first coat dry fully before applying a second coat if needed. For highly used kitchens, a second coat improves washability and color uniformity.
Tip: Respect the product’s drying time; rushing can compromise the finish. - 8
Finish and cleanup
Remove masking tape carefully after paint has dried to the touch, clean tools, and fold up drop cloths for storage. Ventilate the space until cure is complete.
Tip: Proper cleanup extends tool life and keeps colors true across projects.
Your Questions Answered
What is the best paint finish for a kitchen ceiling?
For most kitchens, a washable, low-odor interior paint in a matte or egg-shell finish offers a balance of light reflection and cleanability. Avoid high-sheen finishes that can highlight wall imperfections and require more maintenance.
The best finish is a washable matte or eggshell that cleans easily but doesn’t show every flaw.
Is primer always required on a kitchen ceiling?
Primer isn’t always required, but it’s recommended if you’re covering stains, switching from glossy surfaces, or using a lighter color over a darker base. Priming improves adhesion and color uniformity, especially in kitchens.
Primer helps the paint stick and keeps the color even, especially on stained or glossy ceilings.
Can I use ceiling paint on walls?
Ceiling paint is formulated for light diffusion and may not perform as well on walls, where different wear and washability are required. Stick to walls with wall paint designed for higher traffic and scrubbing.
Ceiling paint is not ideal for walls because it’s made to hide imperfections and isn’t as durable for walls.
How long does kitchen ceiling paint take to dry between coats?
Drying times vary by product and conditions, but plan for several hours between coats in a well-ventilated space. Check the can for the manufacturer’s exact guidance and avoid rushing to the second coat in humid environments.
Most paints dry in a few hours in a ventilated room, but follow the can’s directions for best results.
What are common mistakes to avoid when painting a kitchen ceiling?
Avoid uneven edges by masking edges carefully, don’t overwork the roller, and don’t paint in a stuffy, humid room. Rushing coats often leads to drips or lap marks; take your time for a professional finish.
Take your time with edges, avoid overworking the roller, and keep the room ventilated to prevent drips and streaks.
Watch Video
Quick Summary
- Choose washable, low-odor interior paint with moisture resistance
- Prep surfaces thoroughly for best adhesion
- Use primer where necessary to prevent bleed-through
- Roll and cut in with steady, overlapping strokes for a smooth finish
- Allow adequate drying time between coats to avoid issues